|
This pattern was inspired by a folk arty magazine cover.
It has become popular with our feline loving customers.
:: MATERIALS · PATTERN · NOTES ::
:: Back to Patterns ::
 MATERIALS & SUPPLIES MATERIALS & SUPPLIES
TOOLS -- carving
knife, pencil, saw, toothbrush
SUPPLIES --pinback
(1-1/2 inch), glue, sandpaper
WOOD --
3" x 3" x 1/4" basswood strip
FINISH
- Paints: favorite feline
flavors, optional: antique gel
- Brush: #1, 00, flat or round
- Sealers: fast-dry lacquer,
acrylic sealer
PATTERN
.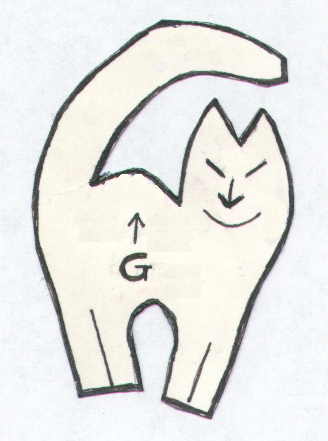
2-1/2" x 2-3/4"
Click to
Enlarge Pattern
PROJECT NOTES
- Transfer the pattern to the wood.
Cut out the blank.
- Using paring cuts, remove the saw
marks on the edge of the blank.
- Round the edges of the blank.
Beware the changes in grain dynamics. If the knife cuts "chunks", reverse
the direction of the cut.
- Sketch a line to divide the back
legs. Use two shallow V-cuts along this line to define the back legs.
- Repeat for the front legs.
- Smooth and round-up as desired.
Brush the carving with the toothbrush to remove loose chips.
- Clean-up the fuzzies. Sand as
needed.
- Damp brush the carving, using a
toothbrush and soapy water. Pat dry and leave to dry.
- Spray with quick-dry lacquer to seal
the wood and let dry.
- Paint in your favorite feline
colors. Let dry.
- Spray with acrylic sealer and let
dry.
- Apply antiquing gel if desire.
Re-seal and let dry.
- Glue pinback and let dry.
- Sign and date the project. It
is done !!

|
|